PROJECT APARTMENT: DIY FAUX BAR TABLEpro
I’m inventing a term: Faux Bar Table. It’s a term meant to service people like me who don’t drink but love the sex appeal of alcohol bottles and need to have them around to generally be happy individuals. And today I’m going to not only unleash this new term on the world but also generously explain how to realise this fantasy and consequently achieve nirvana.
Boys and girls, let’s start from the beginning.
Who remembers the day when I acquired a ginormous stash of empty alcohol bottles from a friend (one of which ended up like this vase)? I wanted to use them SO bad but inspiration was not hitting me. I didn’t want to paint them; the labels were too bloody pretty for that kind of a massacre and I didn’t want to venture into gimmicky; that would’ve been just cruel to their authenticity. Until one day it hit me. I’ve always loved the mini bar carts/tables that you see on home decor blogs but because I have zero utility for them, it wasn’t something I could possibly do, right? It was then that I thought, WHY NOT. So I brought all of those beauties out (there are still some left over so this is not the last you’re seeing of my stash).
Also, who remembers this guy that I bought about 8 months when I was at my last apartment? I’d picked him up from a closing-out sale and it’s about 30 years old. It had also been sitting around at my current place all this time so I brought him out too because it was time.
Next I picked up this folding table from Dubizzle (the Craigslist of Dubai). It was in great shape and ready for a new life. (Here’s a similar image of what it looks like standing up).
Then I put all the empty bottles back in.
DIY BEDSIDE BENCH
DIY BEDSIDE BENCH
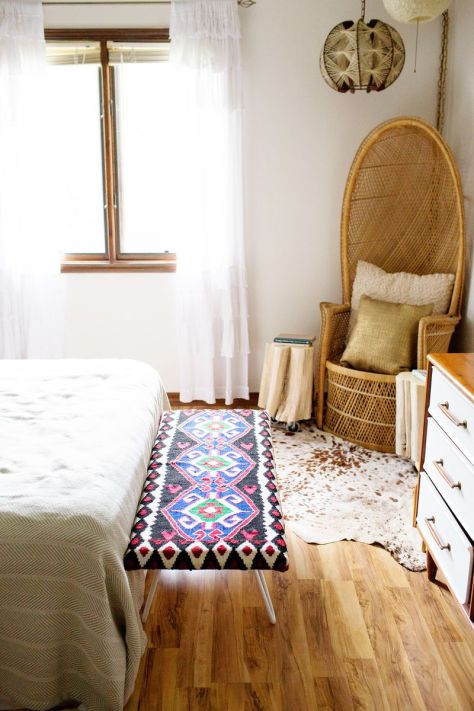
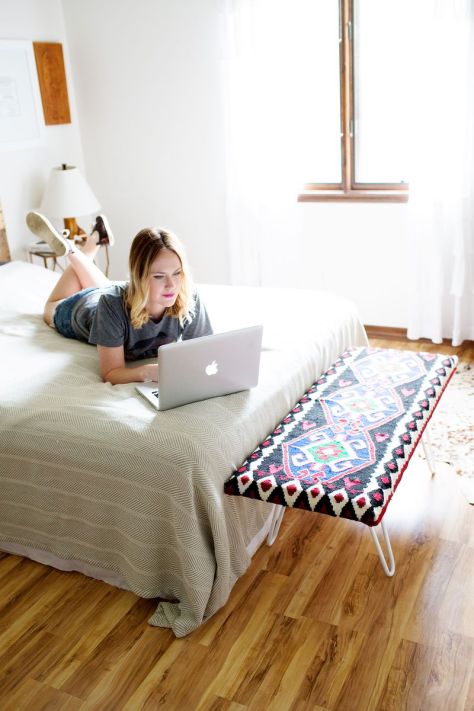 I am still completely obsessed with our home office kilim rugs. They are just so pretty. I really wanted to incorporate a similar pattern into our bedroom. I decided to add a small, foot-of-the-bed bench to our space, and I wanted one that included some kind of kilim rug design (actual or inspired, I’m not that picky). There are a number of different kinds sold online, ranging anywhere from $500-$2000+.
I decided to go ahead and make my own since the project seemed fairly simple. I could then choose my own rug/colors more easily, and the project could be more affordable. I’m so happy I did! I really love this new addition to our bedroom. In case you are curious, here’s how I made my bench:
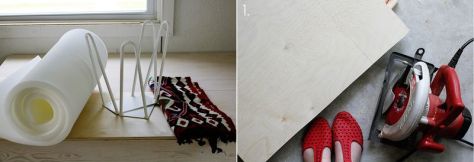 Supplies:
-3/4″ plywood sheet (mine is 44″ x 18″)
-rug (be sure it is at least 2″-3″ inches wider and longer than the bench top—I bought mine on eBay)
-bench legs (I bought two white combination hairpin legs from here)
-1″ foam batting (sometimes sold by the yard or more; see what’s available at your craft store)
-staples
-eight 1/2″ wood screws
Tools:
-power saw (or you can get the plywood cut at the lumber yard)
-power drill
-staple gun
Cost: $195 (this can vary greatly depending on the type of legs you use or the rug you buy)
Step One: Cut your plywood to the size you need. Again, you can totally have the lumber yard (Home Depot, Lowes, Meek’s, etc.) cut the wood for you if you don’t have a power saw.
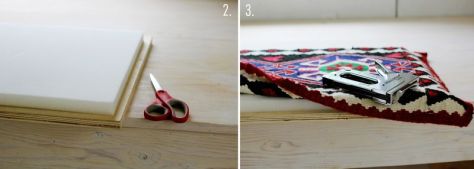 Step Two: Cut the foam batting to fit your plywood bench top. I found that it is best if the foam is about 1/4″ smaller on all sides. This helps the rug to fit over the foam and wood a little easier.
Step Three: Begin stapling the rug to the edge of the plywood. It’s best to really take your time and plan out the corners and make sure the rug and top design are going to fit your bench exactly how you like it. I chose to staple down the two longer sides first. Think of this process sort of like wrapping a present. I found it was MUCH easier to hold the rug in place and staple if I had help (thanks, Jacki!).
 Step Four: Once you have the first two sides stapled, it’s time to fold the end edges and staple those sides as well. If you have to cut part of the rug to fit your bench size, you can use Fray Check or a little glue to help the ends to keep from fraying.
Step Five: Screw the legs of the bench into place. Be sure to measure to get them centered properly.
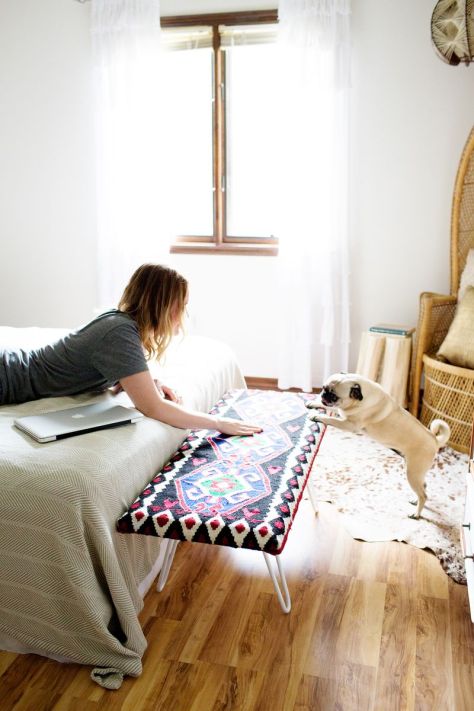
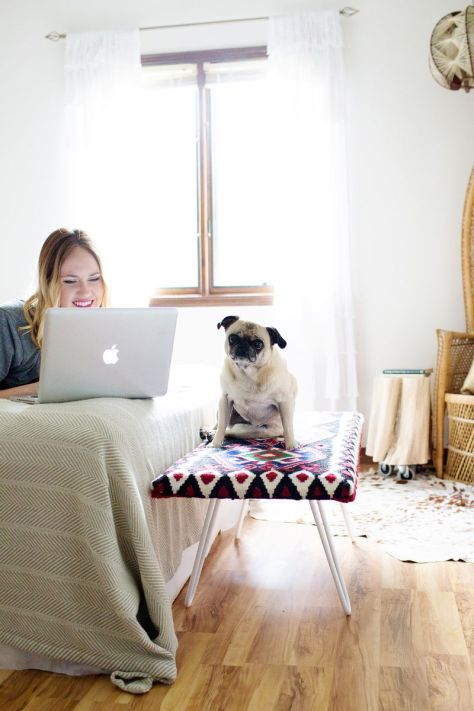 I love how our new bench added a little more color and pattern into our bedroom. Plus this project turned out to be so simple! Once I had all my supplies, it took less than an hour to complete. I also love that you could easily use a slightly stained or damaged rug for the bench top. Great way to use the part of a rug (or thick blanket) that may have some blemishes. Thanks for letting me share! xo. Emma
P.S. My bench is mostly decorative. If you plan to use your bench for seating, I would recommend bracing the bottom of the bench or possibly using thicker plywood.
Credits // Author: Emma Chapman. Project Assistant: Jacki Moseley. Photography: Sarah Rhodes and Emma Chapman. Photos edited with Petal from the Fresh Collection.
(source: http://www.abeautifulmess.com/)
DIY OCTOPUS ART
I don’t think that I would necessarily choose an Octopus design, but I LOVED this idea !
to have room to wrap it over the wood. I went to Home Depot and got 2
2″x1″x70″ for the top and the bottom of the frame then I got 4 2″x1″x68″
for the sides of the frame and the middle supports. Home Depot cut the wood to the desired length for free!
I laid all the wood out with the 1″ side facing up, and screwed each
end of the side pieces and the middle pieces into the top and bottom of
the frame.
the top of the frame.
to where I wanted it on the bottom and nailed in the bottom. Then nailed
in the sides last.
more industrial look instead of a staple gun which could get sloppy. It
was super easy with 2 people, it took us about an hour to make it and
hang it!
Marbling Using Nail Polish
I have to admit, I’ve been wanting to marble something for a looooooong time! I’ve looked at all the different techniques, but the one that caught my attention was this Marbling Using Nail Polish DIY, which inspired this project. So naturally, I gave it a try. Yep, it’s pretty safe to say that I instantly fell in love with how easy it was and how beautiful the results were.

All you will need is a container that’s big enough to submerge your entire object, nail polish and water. Right off the bat I am going to warn you that using old nail polish that you might have kicking around from who knows when will NOT work. I tried it all. It gives you clumpy results, rather than that nice smooth finish you’re looking for.
I used nail polish that was fairly new, it doesn’t have to be expensive by any means! Don’t be afraid to practice until you feel comfortable with your technique. I failed the first few times, but finally got it right on my final two projects. For decor, I simply used an As-Is candle holder form IKEA that we got for $2.50 and an old ceramic trophy I found at Target a couple years ago.
Fill your container with water and drop your nail polish into the water in whatever pattern you desire. I did little swirls, but you can do anything! You may choose to swirl the polish once it’s in the water with a skewer, but I let the polish take on it’s natural form. Don’t wait too long, within a few seconds you should be dipping your object carefully into your water/polish mixture. I simply pressed one side of my object straight down on one side of the container and turned it on the other side as it was making it’s way out of the water so the entire object was covered. If you just want to dip your object into the mixture, simply submerge it until you have the amount covered, depending on the look you are going for.
Carefully place on a dry surface. Do not touch until the object is completely dry! Once dry, display your piece and enjoy! I’ve tried all kinds of colors, there are so many beautiful outcomes! It’s impossible to not have fun with this.
(source: http://www.hellolidy.com/)
DIY Painted Rug Inspired by West Elm
I don’t know about you, but I LOVE area rugs! They instantly change the way a space looks, and are an easy {and temporary} way to add color or pattern to a room.
However, if you are on a tight budget {like us} then you may quickly realize that the area rug you want is out of your price range, boooooo. But then that’s the beauty of DIY, am I right? You can find a style you like and then re-create it in a way that reflects your personality, without spending a ton of money. All it takes is a little bit of time and patience. Trust me, if I can do it, so can you!

Today I am sharing how I created a DIY painted Rug inspired by West Elm, for just $20!
I had originally planned to paint the rug I currently have in my office/studio but after coming across a pattern I loved, I realized I could get the same look with just a sharpie. In case you missed that post or want a refresh you can see my West Elm Inspired Rug here {pictured below}. If you plan to use a design with more lines and less filled in shapes I would definitely recommend the sharpie route. It’s easy, looks great and the rug still feels super soft!

However, if you are looking to fill in patterns and shapes with more color then you may want to try out the painted rug route.
West Elm Inspired DIY Painted Rug:
One day while browsing the West Elm website I came across the Phoenix Wool Dhurrie rug and instantly fell in love. The geometric/kilim pattern was fun, simple, classic and modern all rolled into one. It seemed perfect for our dining room!
Of course the price tag of $350 for a 5×8 was a bit steep for us so I decided to create my own version using this design as my inspiration.
I know that one of the reasons area rugs can be expensive is because of the materials and craftsmanship involved. My rug wouldn’t be nearly as perfect or soft, but I was okay with that. When you have $20 you can spend on a rug, you have to make do with what you have. Besides, I really enjoy all of the stories behind the DIY projects in our home, and no one has anything exactly like it 🙂
The inspiration:

Here is the before photo of my 5×7 Remnant Rug:
{Full Disclosure: This post may contain affiliate links, meaning if you click through and make a purchase, I may receive a small commission at no extra cost to you. This helps me run and maintain the site, thanks for your support! View My Privacy Policy here.}
Materials Needed:
Rug
Paint
Cardboard Template of shapes to use {optional}
Patience
90’s Music {optional}
By the way, one of my favorite ways to save money on rugs is to purchase remnant rugs from Home Depot or Lowes. The rug I used in my office cost less than $30 and the one I’m sharing today was only $20! I always like to check to see what remnant rugs are in stock when I’m in there because it can be somewhat random, and you never know what you will find. I’m all about the treasure hunt so I’m okay with that 🙂 It would have been nice to get one a bit larger but I figured 5×7 would do, especially for the price!

I already had the fabric medium on hand that you use to mix with your paint color since I had purchased it back when I bought the rug above, thinking I’d use it, but didn’t. I did actually use some of it on the DIY lace curtains I shared. I purchased the $20 remnant rug soon after we finished building our West Elm Inspired dining table, so I actually had everything on hand that I needed, woo-hoo! You can use acrylic or latex paint, and I just used some custom mixed navy and turquoise paint. Just make sure that if you custom mix a paint color, that you make more than enough. The last thing you want is to run out of paint before your rug is finished.
The first thing I did was create the shape templates in illustrator. I’m not gonna lie, I suck at math and am a more visual person so I thought planning it out on the computer would be easier. Plus this way I could play around with where I wanted the shapes and what color to make them too. I actually still screwed it up, but I’ll get to that a little later…

I decided to create 3 separate shapes, enlarge them, and then printed each individual shape out from my home printer. Each shape took up a few pieces of paper so I used some of the Delicate Frog Tape to tape the pieces of paper together. I actually won a bunch of Frog Tape {YAY!} when I attended Haven, and I had never used the delicate kind before. It was perfect because it didn’t tear the paper and I even had to move it around a couple times.
After each shape was taped together I cut the shape out, then placed it on a piece of cardboard, traced it with a sharpie, and then cut out the new cardboard template. The cardboard template is what I used to “stencil” onto the rug. The photos below probably explain this better than I can.

I did this for all 3 shapes until I had 3 separate templates cut out of cardboard.

After I had all of my cardboard templates printed out I started marking out my measurements onto the rug using chalk as a guide for where my templates would start. This is when I realized I totally screwed up my plan.
When I enlarged the shapes on my computer I apparently made them too large, which threw off my original design plan. Oops. I had even tested out the first template to see how it would fit along the rug, but had only gone along the height of the rug, and not the width. This meant that I had to alter my design a bit and went with just 3 columns of vertical shapes. I considered re-printing and cutting the templates but decided just to roll with the punches instead.
It didn’t take long to line up where the shapes would go since I lined the first column against the edge and 3.5 inches apart, and then started the middle column smack dab in the center. I also used my original printed out shapes as a guide in addition to my cardboard templates {as seen in the photo below}. Once I had my template lined up I simply traced around it using a sharpie marker. I alternated between 2 different sharpies to make it easier when one was running low on ink.


This took a bit longer than expected and it was pretty late, so after I had traced all of the shapes I decided I would do the painting part the next day.


By the way, the paint dried slightly darker than it originally looked when I painted it on. Just FYI so you don’t end up with a color darker than you wanted. It’s probably best to test an area first to see if the color looks the way you want it to. I had started painting one of the patterns on my rug and then decided I wanted the color a bit lighter, so I just painted over the part I originally painted.

Before I started painting I put a couple of old tablecloths underneath the rug just to make sure no paint went through. You could use a dropcloth, newspapers, an old sheet, etc. The paint didn’t go through the rug at all actually, but better safe than sorry, right? I worked on the rug in our bedroom with the door shut so our pets wouldn’t run all over it or have their fur fly in the paint. Funny how as soon as a door shuts they freak out and wanna come in. If you have pets are yours the same way?
After I had my navy paint color mixed I used a foam brush {several actually} to apply the paint to the shapes on the rug. I originally tried a regular paint brush but found that the foam brushes worked much better. If you have really large shapes or stripes you could also use a foam roller.

After the paint had dried I actually went around and painted over the shapes one more time. A couple hours and many foam brushes later, my rug looked like this:

and my brushes looked like this:

Lol. Well, even when the foam part broke off I still used it to sorta squeegee the paint onto the rug. It worked surprisingly well and I wasn’t afraid to get a little messy.
I actually really liked how the rug looked with just the dark navy {it looks a bit darker in the photos then it does in person}. Our dining room doesn’t get too much light though and is super beige so I wanted to add a pop of turquoise to brighten it up a bit.
I was impatient so after a few hours it seemed dry enough so I went ahead and started painting around the edges of the pattern using a smaller paintbrush and some custom mixed turquoise paint. Don’t you just love how the paint is in an old tostitos jar? haha.


It was so much fun watching the rug transform before my eyes, talk about instant gratification! At first I was bummed that I screwed up my original design plan, because I really wanted to have more than 3 columns, but I still think it turned out pretty awesome. In fact, I think it worked out pretty good because now there is more contrast in the dining room with the additional white showing on the carpet.
Here is the rug all finished:


I actually want to pick up some fabric protector to spray over it just to make sure all that hard work lasts. I will probably do that next weekend.
So what do you think? Have you painted a rug before or are you considering making one? I LOVE our new dining room rug and I will admit that the painted areas are a bit stiff but not too terrible and since it’s in the dining room and not the bedroom I’m totally cool with that.

I am including the templates I created in case you want to use them for your own home project – be that a rug, wall, furniture, art, etc. Just remember these are for personal use only 🙂 If you do use them on a project I’d love to see it afterwards! The sizes of the templates are rather large and arenot perfect, but hopefully you can get some use out of them. I am including each individual shape I used, and then all 3 scaled down as well. You don’t have to use the same pattern either, but can play around with the shapes to create a new one too!
Download FREE Printable Templates
Click on the download button below the images below to download the kilim Pattern Stencil Templates that you can use on a rug or any other design project.


These templates are for personal use only, and cannot be resold or redistributed.
UPDATE: I’ve had this rug for about a year now and still LOVE it! It seems to have gotten softer over time – although the painted areas are still crunchy} and is holding up really well. I have no problems vacuuming it or doing spot cleaning. The best advice I could give is that if you create a custom color be sure to have extra set aside, or know exactly how you made it. There are a few spots where my cats have scratched the rug and it could use a couple touchups, but I don’t have the same paint so I’ll have to try to color match it.
Here are some photos of it in our dining room:


(source: http://upcycledtreasures.com/)
Log Slice Table


Note: Greg’s back!
There’s nothing unusual about an end table that’s made from a chunk of tree; in fact, you probably own a few yourself. Things start to get exciting, however, when you can still see the bark and count the rings to find its age! Tree decor is everywhere these days — from branch chandeliers and coat hooks to log pedestals and candle holders. When Jennifer and I saw these log side tables in Domino magazine (Ippolita’s Cigarette), we had to have one (or two or three).

The only trouble was the exorbitant $1,100 starting price. Each. (In comparison, the most expensive piece of furniture we own is the IKEA Malm bed we bought secondhand via Craigslist in Atlanta.) So we decided to do things the old-fashioned way and turn a little elbow grease and a cannibalized IKEA stool into our own log table.

The first order of business was acquiring the log. My parents burn a fair amount of wood both for grilling humongous burgers and to ward off those frigid Southern California winters. Consequently, my dad is always willing to stop for free firewood someone has put out by the curb, including this large section of downed pine they let us scavenge from their wood pile.
The next step was to cut a five inch slice of the wood for the table top. This is best accomplished with a chain saw, which is great for cutting logs but leaves the wood rough and uneven. To level out the surface, I broke out the belt sander. Belt sanders wear down wood very quickly, which makes them great for leveling uneven spots but (at least in my hands) leaves behind imperfections of their own. So after approximately leveling the surface with the belt sander, I took an orbital sander to it, beginning with 80 grit to remove the belt sander marks. I gradually increased the grit, ending with 200 to give it a nice, smooth finish.

Finally, after disposing of the resulting dust (with a rag and air compressor), I applied three coats of polyacrylic to the top for protection from nicks and liquids. I also applied clear lacquer spray to the bark on the sides for protection.

We then attached the log to the legs of an IKEA Marius stool ($5.99). For a more rustic look, we spray painted the glossy legs with flat black paint.

Photo of Ippolito Cigarette from Domino Magazine (RIP!)
(source: http://seakettle.com/)
Ikea Hack: Leather Lounge Chair
My next quite-a-lot-of posts will be all about small home designs, ideas and hack I come across and love. Just to freshen up the blog a bit!
Guess what? We have another Ikea hack and it’s equally as lust worthy. Meet the Leather Lounge; a DIY project that will take this impossibly bright Ikea chair and transform it into a vintage inspired lounge number. It’s all part of our Operation Abby’s Office Redo. That beauty, in all its bright eclectic goodness is coming up next! And for even more Ikea hacks, click here!


Ikea chair
1 1/4 yards thin bonded leather fabric
Sewing machine
Leather sewing machine needle
Heavy duty thread
Scissors
Sharpie
1” wide velcro strip at least 20” long
Gold spray paint
Seam ripper

 Assemble the chair frame according to the instructions. Spray paint the frame gold. You’ll want to do this outside or in a well-ventilated area, and on some cardboard or a plastic dropcloth. Spray it from all angles, in 2-3 light coats, to prevent drips. Let it dry 1 hour.
 Use the seam ripper to open up the Ikea seat cover and separate each main piece (the top and bottom shape for the front and back, 4 pieces total). You won’t need the long skinny piece that runs the along the side of the chair, between the front and back of the cover. Make sure to rip up the seams of the hem, too, so you get the full width of the fabric.
 Label each of the four pieces with a letter and label a picture of the finished chair with the same letters so you can remember how it goes together later.

 Lay out the leather fabric (backside up) on the floor and trace each piece of the Ikea seat cover in sharpie. Write the corresponding letter on each piece.
 Cut out each piece. Sew velcro strips onto the bottom pieces (in the same spot they are on the original covers).
 Sew the top & bottom pieces together for the front and back of the chair.
 Layer the front and back pieces, backsides facing out. Sew together along the outer edge leaving a ½” border. Flip the cover inside out.
 Slide the chair cover on the frame and velcro the bottom.

Photography: Nicole Baas | Design and Styling: SMP Living
(source: http://www.stylemepretty.com/)
Miniature-calendar.com
Have you come across this amazingly cool work ? *excitement*

(above) ‘pace’
tatsuya tanaka crafts intricate miniature calendar of everyday scenes
since 2011, tatsuya tanaka has been engaged in his ‘miniature calendar‘ — a project which has seen the art director create a pocket-sized scene of everyday life, on a daily basis. what initially started as a means of photographing his collection of diorama dolls amongst familiar settings constructed to scale, has now unfolded into a long-term venture… one that he’s not likely to stop anytime soon. we spoke with the japanese creative about what fuels his ideas for 365 days of the calendar year, and of the more than 1000 scenes he’s made, which ones he’s particularly fond of and have a personal meaning for him.

‘steak’
designboom: why did you begin making this miniature calendar?
tatsuya tanaka: the idea came from a comment on instagram, in which a follower wrote, ‘I want to see the miniature calendar everyday‘. so, while I answered by posting something daily, the thought of the project was too good for me to quit. I find a lot of joy in continuing to make the miniature calendar, I haven’t thought about stopping anymore. in the early days, I created these scenes for the purposes of photographing my collection of diorama dolls, but after a while I found it interesting to express ‘likening one thing to another’; and now I have found my style at present.

‘bouldering’

‘banana shop’
DB: are there particular themes or concepts that you are looking to express through this project?
TT: the theme is ‘the interest of likening one thing to another’. in doing so, you can see how everyday things can become more fun when imagined in a different way. it is important that the ‘miniature calendar’ is understandable in its intention for everyone – young and old, of any nationality. so, I try to use familiar things and address familiar matters.

‘hide and seek’

‘install’
DB: how do you go about generating ideas 365 days of the year for the calendar? including titles for each piece?
TT: I often conceive ideas while working and carrying on with everyday life, so even though they are trivial matters when I conceive them, I am sure to make a note. I use the iPhone application ‘omnifocus’ which lets me quickly store my concepts. I sort these under categories like ‘practicable now’, ’necessary materials to put an idea into a practice’, ‘hints for ideas’ etc… and I decide what I will create next and what materials I will use by checking these memos.

‘dinner’
DB: what is the most challenging aspect of creating your calendar dioramas?
TT: posting works every single day, in itself is my challenge. I have been doing this since april 20th, 2011 so the project is now in its fifth year. those who have seen my works all the way through to this point have a good eye, so creating ideas that exceed their expectations is also a challenge. after certain ideas are exhausted, I think there will always be more interesting ones.

‘ironing’

‘paper sea’
DB: could you speak a little bit about the material choices you make when crafting each diorama?
TT: I make a conscious effort to chose universal materials whose scale can be understood. for example, we can see the scale of vegetables or stationary; as opposed to unique toys or electric appliances whose dimensions are more difficult to understand. without understanding the scope of the motif, the interest and intention of the idea decreases – so I pay attention to these matters. in collecting my materials, I make a conscious effort to keep things even though they might seem useless, such as clips for closing bread packaging, clothes tags, toilet paper rolls, ice lolly sticks and so on… because I don’t always know right away how they will be useful.

‘bamboo forest’

‘picnic’
DB: do you have a particular one that is a favorite, or that stands out for you?
TT: I have a special attachment to the broccoli work ‘picnic’ which is on the cover of my photo book; and ‘way home’ which I have likened tatami mats to rice fields. when I was a child would compare broccoli to trees and in these scenes I would play with my superhero doll who would be fighting a monster in this forest. I also imagined the edge of a tatami mat as a footpath between rice fields, and would play with miniature cars in this way. I think this childhood imagination and experience can be strongly linked to the miniature calendars. broccoli and tatami were my initial symbols of likening.

‘way home’

‘rice planting’

‘slanting rain’
DB: what are your future plans for the miniature calendar?
TT: I would like to make an original miniature diorama doll by myself. I already change the color of ready-made dolls and rearrange them, but I have never made a figurine from scratch. by being able to make the dolls as I want them to be will allow my ideas to expand. at the end of the year I will have an exhibition in kagoshima, and then osaka in the new year. I would like to increase the opportunity to talk with people about my work. I will update the public with more specific information on the miniature calendar website and through my SNS page, so please check them.

‘take a shower’
(source: designroom.com, miniature-calendar.com)
Will educate girls for food: a plan to fight poverty and illiteracy is helping Egypt

The United Nations World Food Programme has been providing food to kids in Egyptian schools since 1968, but in April it began to focus its efforts on children who are most at risk of entering the labor market. In some of the poorest and most remote areas of the country, a high-energy date bar awaits each student who makes it to class. More school, more food.
The date bar students get each day in the classroom provides 25 percent of their daily nutritional needs. Students who attend 80 percent of school days per month take home rations for their families, including 10 kilograms of rice and one liter of oil. Since April, nearly 24,000 children have been given food aid in this four-year, $65 million project funded by the European Union. The goal is to reach 100,000 children in Egypt’s poorest areas.
“In those rural and remote areas, girls’ education is not a priority for the families,” explained Amina Al Korey, communications officer for the WFP in Egypt. Public schools are far away, and if they are reachable by foot, the walk is seen as unsafe for girls.
Safety may be a concern, but patriarchal values also play a role.
“The concept they have is the girl is going to get married and stay home, so if they need to get one of their children educated, they’re going to focus on the boys,” Al Korey said. “With our project, we focus on the girls because we feel we are their chance to get an education.”
In Egypt, 15 percent of children end up working to help support their families. The take-home rations available to children with good school attendance equal the value of what they could earn in a month of work, leaving little reason to keep a girl at home.
Girls get first priority registering at the one-room community schools that are supported by the WFP and under the supervision of the Egyptian Ministry of Education; if any available spots remain, boys are admitted.
“Whenever I speak to the girls, they’re always just so enthusiastic about actually going to school,” Al Korey said. “They don’t just feel good about getting an education and getting a chance to take a different path: ‘Maybe I’m not just going to get married and have kids and raise them. Maybe I can actually become someone.’ They’re also helping their family out.”
The mothers of the children benefit in ways that will last longer than a monthly ration. The WFP plans to provide 50,000 mothers with training and support to start income-generating projects breeding goats, selling vegetables, and making soap and detergent, which Al Korey called the sustainability aspect of the program.
“I’ve seen a mother who started off selling tomatoes and cucumbers, and that was it. Now she sells vegetables and fruits, and she has her regular customers. She’s doing quite well. It’s great to see the mothers be able to rely on themselves instead of sending their kids to work,” she said.
One-quarter of Egypt’s 86 million people live below the poverty line, and education is one way to curb that ill. In Africa, boys are 1.55 times more likely than girls to complete a secondary education, the World Bank found. “The girls were never on the map,” said Al Korey.
So, Why Should You Care? Put a girl in school, and the ripple effects are far-reaching. Girls who go to school can make up to 25 percent more in wages later in life, and when a woman earns money, she will reinvest 90 percent of it in her family. She is healthier, and so are her children. At least 12 million children—a quarter of the world’s population of malnourished children—could be saved from malnutrition if women in developing countries were given a secondary education.
“Investment in girls’ education may well be the highest-return investment available in the developing world,” wrote former World Bank chief economist Larry Summers.
The benefits are obvious, and they can begin with a date bar.
Of the students at Egypt’s community schools, especially the girls, Al Korey said, “Sometimes when you don’t have the opportunity to do something for so long and then someone just gives you that chance, you want to grab it and do the best you can.”
Sarah McColl has written for Yahoo Food, Bon Appetit, and other publications. She’s based in Brooklyn.
(source: globalcitizen.org)
